

One of the Pootles team posted a magic card that she had made and I knew I had to try it for myself, so after searching YouTube and Pinterest I cased this one from France Martin.
Card Base – Bermuda Bay 11″ x 5 1/4″
Divider – Whisper White Cardstock 5″ x 4 1/8″
Slider – Whisper White Cardstock 5″ x 3 7/8″
Window Sheet 5″ x 3 7/8″
Coastal Cabana Frame – 4″ x 3″
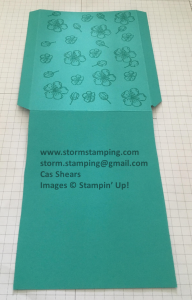
To make the card Base,
score on the long side at 5 1/2″
Score on the short side at 1/2″ and 4 3/4″
Cur down the narrow 1/2″ edge to the 5/1/2″ scoreline as shown in the picture.
Notch the remaining flaps
Stamp the front of the card using the matching colour for a tone on tone effect
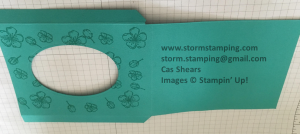
Cut your shape into the front of your card using the second biggest stitched Oval dies.
To make the frame use the two biggest stitched Oval dies.
Glue the frame to the front of your card.
 Punch a thumb hole in the top of the card.
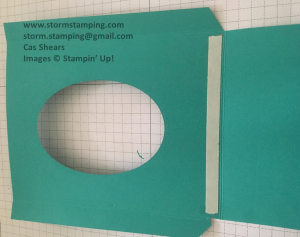
Add a piece of tear and tape to the inside front of the card just above the scoreline as shown in the picture.
Put in the Whisper White divider .
Add tear and tape to the flaps and seal up the card.
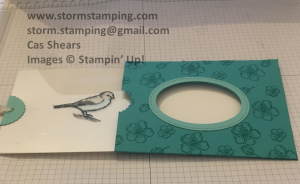
Join the Whisper White slider Card and the window sheet together with a little bit of snail.
Put the slider in and mark where the frame lies. Separate the two slider pieces
Put the window sheet in the Stamparatus and line up the stamp within the lines for the frame. Stamp onto the window sheet with Stazon Black ink.
Put the slider cardstock into the Stamparatus in the same place and stamp the image again in Memento Black ink.
Colour the image on the Whisper White Cardstock and then rejoin them with a little snail.
Cover the join with a small punched circle and make a hole through and add the ribbon.
Finish by adding a sentiment.
The ladies from my class were very excited with their cards 🙂
Until next time, happy crafting
Cas xx
Product List
- Free As A Bird Cling Stamp Set [149468]
- Stitched Shapes Dies [145372]
- Simply Scored [122334]
- Stamparatus [148187]
- 1-3/8″ (3.5 Cm) Scallop Circle Punch [146139]
- Card Stock A4 Bermuda Bay [131286]
- Whisper White A4 Card Stock [106549]
- Card Stock A4 Coastal Cabana [131302]
- Whisper White C6 Envelopes [106588]
- Window Sheets [142314]
- Bermuda Bay Classic Stampin’ Pad [147096]
- Tuxedo Black Memento Ink Pad [132708]
- Jet Black Stāzon Ink Pad [101406]
- Crumb Cake Stampin’ Blends Markers Combo Pack [144601]
- Bermuda Bay Stampin’ Blends Markers Combo Pack [144600]
- Pool Party Stampin’ Blends Markers Combo Pack [144605]
- Mango Melody Combo Pack Stampin’ Blends [147945]
- Very Vanilla 3/8″ (1 Cm) Scalloped Lace Trim [149593]
- Snail Adhesive [104332]
- Tear & Tape Adhesive [138995]
